Open Access v4 Jumpers: Difference between revisions
Jump to navigation
Jump to search
No edit summary |
|||
| (One intermediate revision by the same user not shown) | |||
| Line 1: | Line 1: | ||
== | ==Hardware Settings and Defaults== | ||
[[File:AC400_1024x1024_jumpers.png]] | [[File:AC400_1024x1024_jumpers.png]] | ||
The Open Access comes ready to run out of the box | The Open Access comes ready to run out of the box, advanced users may want to customize their hardware. The following is a list of hardware features that can be selected via jumpers. | ||
<BR> | |||
*1 USB Power - Enable this jumper to allow the board to be powerd via USB or power an attached accessory. | ===Jumper Table=== | ||
*<b>1 USB Power</b> - Enable this jumper to allow the board to be powerd via USB or power an attached accessory. | |||
**Default: ON | **Default: ON | ||
**Recommend turning this off if you need to ensure that your external device does not remain powered by the OA's 5V USB connection. | **Recommend turning this off if you need to ensure that your external device does not remain powered by the OA's 5V USB connection. | ||
*2 USB/RPi Selector - Determines whether the Open Access communicates via the mini-USB port or the Raspberry Pi connector | *<b>2 USB/RPi Selector</b> - Determines whether the Open Access communicates via the mini-USB port or the Raspberry Pi connector | ||
**Default: Both jumpers UP (USB) | **Default: Both jumpers UP (USB) | ||
**Set both jumpers in the pair to "USB" (top) setting to connect the serial output to the FTDI-based USB port. | **Set both jumpers in the pair to "USB" (top) setting to connect the serial output to the FTDI-based USB port. | ||
**Important: Move both jumpers for proper operation. One jumper is for TX and one is for RX to the Atmgea328P. | **Important: Move both jumpers for proper operation. One jumper is for TX and one is for RX to the Atmgea328P. | ||
*3 RS-485 Termination - Enables a termination resistor for end-of-bus on an RS-485 circuit | *<b>3 RS-485 Termination</b> - Enables a termination resistor for end-of-bus on an RS-485 circuit | ||
** Default: ON | ** Default: ON | ||
** Recommendation: Leave this to ON if connecting 0-1 devices, or if it is the last unit in the circuit. | ** Recommendation: Leave this to ON if connecting 0-1 devices, or if it is the last unit in the circuit. | ||
*4 Reset Enable - Can be used to disable the resetting and re-flashing of the Open Access CPU | *<b>4 Reset Enable</b> - Can be used to disable the resetting and re-flashing of the Open Access CPU | ||
** Default: ON (Reset enabled) | ** Default: ON (Reset enabled) | ||
** Recommendation: Set this to OFF for increased security; setting it to OFF will prevent a reset and bootloader access. Set to OFF if a USB-attached peripheral may hard-reset and interfere with operation of the unit. Set to ON to allow programming/reset from USB. | ** Recommendation: Set this to OFF for increased security; setting it to OFF will prevent a reset and bootloader access. Set to OFF if a USB-attached peripheral may hard-reset and interfere with operation of the unit. Set to ON to allow programming/reset from USB. | ||
Latest revision as of 15:41, 11 May 2014
Hardware Settings and Defaults
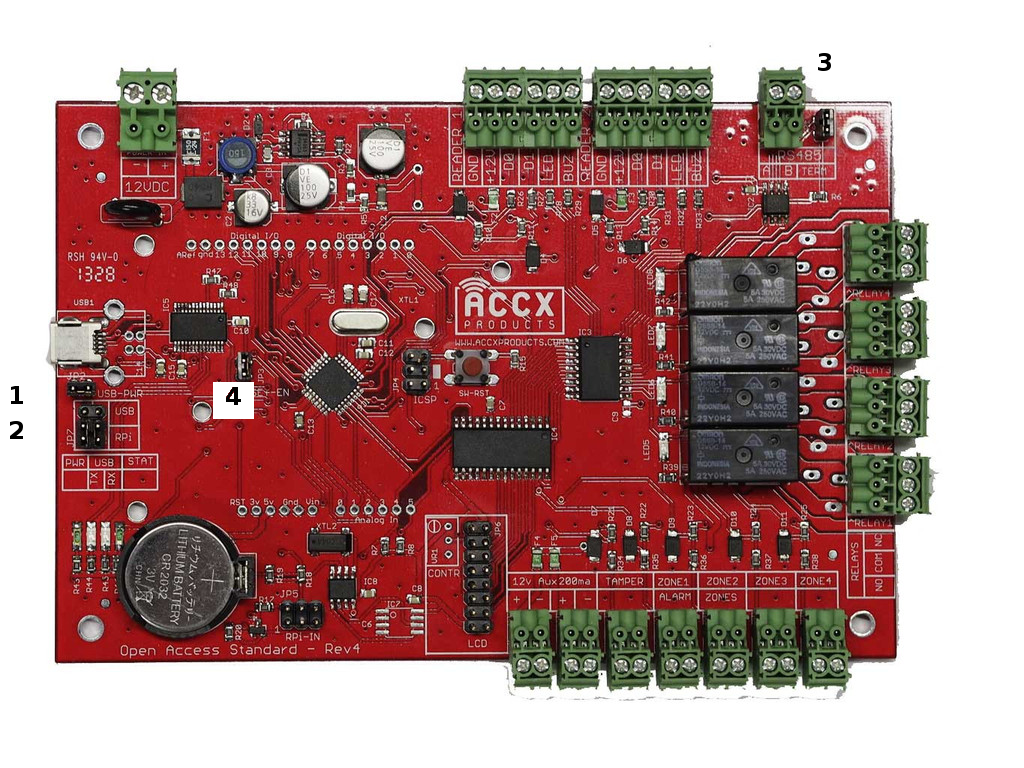
The Open Access comes ready to run out of the box, advanced users may want to customize their hardware. The following is a list of hardware features that can be selected via jumpers.
Jumper Table
- 1 USB Power - Enable this jumper to allow the board to be powerd via USB or power an attached accessory.
- Default: ON
- Recommend turning this off if you need to ensure that your external device does not remain powered by the OA's 5V USB connection.
- 2 USB/RPi Selector - Determines whether the Open Access communicates via the mini-USB port or the Raspberry Pi connector
- Default: Both jumpers UP (USB)
- Set both jumpers in the pair to "USB" (top) setting to connect the serial output to the FTDI-based USB port.
- Important: Move both jumpers for proper operation. One jumper is for TX and one is for RX to the Atmgea328P.
- 3 RS-485 Termination - Enables a termination resistor for end-of-bus on an RS-485 circuit
- Default: ON
- Recommendation: Leave this to ON if connecting 0-1 devices, or if it is the last unit in the circuit.
- 4 Reset Enable - Can be used to disable the resetting and re-flashing of the Open Access CPU
- Default: ON (Reset enabled)
- Recommendation: Set this to OFF for increased security; setting it to OFF will prevent a reset and bootloader access. Set to OFF if a USB-attached peripheral may hard-reset and interfere with operation of the unit. Set to ON to allow programming/reset from USB.
